Pages

Thursday, May 21, 2020

After effects timeline

After effects timeline


What is timeline in after effects


Timeline is an important section of after efftect from where we make adjustment in the parameters of animation or we set key frame from here for making animation in after effects. 
In timeline we have two sections that are
  • Layer panel &
  • Frame section

We have discussed Layer panel in pervious article you can visit this link for layer panel.
Today we will discuss about frame section of timeline.
This is timline frame section in which we have different component for handling parameters of animation in after effect. Let us discuss different component of frame section of timeline one by one.

Play head

This is move head by moving it we can set keys on our layer for animating them. You will see only that section of any animation at which frame play head lies at particular time.

Rural

This will show you time of your animation. Time of ant animation divides into hour, minutes, second and frame. So you can see per frame value in rural by zoom in work area.

How to Zoom in or zoom out work area of timeline in affter effects

We can zoom in or zoom out work area of any composition for seeing each frame or full time of composition by these buttons. Press this button of zoom in
And press this button for zoom out
You can also drag this circle in left or right direction for making your work area as  zoom in or out.
You can also drag this bar for zoom in or zoom out purpose as per your requirment.
This bar is time bar of particular layer. You can adjust start or end point of your layer by making changes in this bar.
For example if you want to start this layer from 2 sec. Then select this layer and place play head at 2 sec then press [ button of keyboard and your layer will start from here.
Now if you want to end this layer at 8 sec then select this layer and place play head at 8 sec the press ] button from keyboard. Now your layer will end at 8 sec.

How to adjust work area in after effects

This is work area bar. You can adjust it according to your composition requiremsnt.
For specify starting frame of work area place play head at your desired frame then press B button from ketboard. Your work area will start from this point.
Now if you want to end your work area at 7 sec then place play head at 7 sec then press N button from keboard. Now your work area end at 7 sec.
In this way you can understanf timeline in aftereffects.

Auto cad units setup

Autocad units setup


Today we will discuss about units option and unit setup of auto cad. We will learn about how to set unit in auto cad or how do unit setup in autocad.
We will understand major content of unit setup box and analyze their purpose one by one. 
We have two types of unit set up in autocad. One is in which you measure your drawing parameters and second is which you display with your drawing as dimensions of your drawing. So let us discuss them.

How to set unit in autocad


Steps for unit setup in autocad


  • Go to autocad icon of this software.
  • Click on drop down small arrow button.
  • Go to Drawing Utilitize option.
  • Move mouse pointer to small arrow button of this option.
  • Click on Units option of new list.
  • Set your desired parameters of units from opend popup box.


Explanation of steps

We will understand in very easily way.

  • First go to icon of auto cad software which is at the top left corner of commands bar and click on small drop down arrow button. When you click on it a popup list will be open.
  • Go to Drawing Utilite option of this list and move mouse pointer to its small arrow button for opening in list. Now click on Units option of new list.
  • Or you can type UN from keyboard then make enter from keyboard.
  • When you choose any one of the option a popup box will be open. We have number of parameters option here in this box. We will discuss each one by one.

How to set architechural unit in autocad
Steps

  • Open units box.
  • Type UN from keyboard then press enter.
  • Go to lenght option of unit setup box.
  • Choose architechal option.
  • Set precision.
  • Choose inches option from.
  • Set angle unit if required.
  • Click on ok button of the box to apply thi unit.

Explanation of steps

  • We consider feet and inches in architechtural unit. So for architechtural drawing we set our unit in feet and inches. For setting it. Go to unit setup box of autocad and click on dropdown arrow of lenght option, choose archituctural option here.
  • Then set precision value from drop down list of it as per your drawing requirment.
  • Go to units box and choose inche because it is smallets unit in architechtural option.
  • When you set your desired parameters click ok.


How to set Engineering unit in autocad


It is similar to architectural unit. The difference is that the vale of engineering unit shows in point not in fraction.


How to set meter units in autocad


When we want to measure our drawing dimension in meters, centimeter, milimeter or kilometer then choose decimal unit from length option of this box.
Steps
  • Open units box.
  • Or type UN from keyboard then press enter.
  • Go to lenght option of unit setup box.
  • Choose decimal option.
  • Set precision.
  • Choose milimeter option from.
  • Set angle unit if required.
  • Click on ok button of the box to apply thi unit.
This is a way you can set unit in autocad as per your drawing requirment.


Monday, May 4, 2020

How to import any file in after effects

Importing file in after effect

Hey guys today we will discuss about how to import any file in after effects and get introduce with this software. As we know After Effects is Motion graphics software which is used by many graphics editor for their professional works so let us now discuss how we can import any type of file in this software. 


But before starting our discussion on  After Effects Software, i think we should know each and every point about After Effects software because after going through major content of After Effects, handling of this software throughout our article became easy task for us. So let me tell you the major points of our article, so that you can get brief knowledge about this article.

These are major points which we will discuss in this article:

  • What is After Effects?
  • System requirement of After Effects software
  • File Format supported by After Effects
  • Importing any file in After Effects

So these are four major points of our discussion in this article. Let us now discuss them one by one.

What is After Effects software?


After Effects is mainly used for video editing work by video editing professional but it has wide range of working area some of them are we can make Motion graphics in it, we can animate object or any logos in this software, we can manipulate any video footage as well in this software. You can use this software as additional software with some other graphics designing software as per your requirement.

System Requirement of After Effects Software:


After Effects software was developed by Adobe Inc. in January 1993 as video editing software and today it is a part of Creative Cloud desktop application of Adobe systems. This software is compatible with Windows 10, Mac OS and their later versions. If you want this software on your laptop or on personal computer or on tablet you need these system requirements which are as follows:


For Windows
  • Processor required: Multi-core Intel Processor (64 bit)
  • Operating system required: Microsoft Windows 10 (64 bit) and its later versions
  • RAM required: 16 GB minimum required (32 GB recommended)
  • Hard disk Space required: 5 GB required (Additional free space required during installation of  software)
  • Monitor resolution required: 1280 X 1080 or greater
For Mac OS
  • Processor required: Multi-core Intel Processor (64 bit)
  • Operating system required: mac OS 10.13 and its later versions
  • RAM required: 16 GB minimum required (32 GB recommended)
  • Hard disk Space required: 6 GB required (Additional free space required during installation of  software)
  • Monitor resolution required: 1440 X 900 or greater

Internet connection required for both for different purposes such as for activation key, for updating the software and many others.

Now after getting knowledge about systems requirement of After Effects software another question come into your mind. ‘What is that? Let me tell you it is ‘which type of files supports in this software. So let us have a look on supported file of this software.

Which type of file format supported by After Effects?


We have number of file format that are supported by After Effects but i will tell you some important file format here in this article for your knowledge. These file format are as follows:

Audio File Formats

MPEG (Moving Picture Expert Group) formats such as MPEG, MPG, MPE, MPA,M2V, MP2, M2A, M4A, M2T, M2P, MPV, VOB, MOD, AC3, MP4, M4A, M4A.
AIF/AIFF (Audio Interchange File Format): it can be import and export both.
WAV (Waveform) it can also be import and export both.

Image File Formats:
  • Al, PS, EPS (adobe illustrator): these can import only in this software.
  • PDF (Portable Document Format): It can import only.
  • PSD (adobe Photoshop): it can both import and export in this software.
  • BMP, DIB, RLE (Bitmap): It can import only in this software.
  • JPEG/JPG (Joint Photographic Expert Group): It can both import and export in this software.
  • PNG (Portable Network Graphics): It can import and export both in this software.
  • TIFF/TIF (Tagged Image File Format): It can both import and export in this software.

These are some file format that supported in this software on Audio file format and Image file format basis.

How to import any file in after effects?


Steps:

  • Go to file menu of menu bar.
  • click on Import option of the list.
  • click on File option of popup list of Import option.
  • Select your desired file from import box.
  • click on import button of this box. 
Explanation of Steps:

You can understand import as a command through which you can place any type of file such as audio, video, image etc in after effects software. So for placing your desired file into after effect we use import option of this command. This file can b your own or you can any other supported file taken by you from anywhere else.

So let us discuss the topic how to import any file in after effects. We can import files on after effects in just few steps. So be with this article from start to end for getting knowledge about importing of any file in after effects.

But before learning about this topic think you should get introduce with the User interface of this software. By User Interface i mean sections of working screen of this software so that you can easily understand the area of this software which will be involve in our learning. So let us have a look on those sections.

At the top of the user screen you will find two ribbons you can call first one as Menu bar and second one as Tool bar next move to below these two ribbons. There the screen is divided into three sections in which the left one is Project Panel with Effects Control panel, middle one is Composition window, and right one is Parameter tab section. Moving to next area of this software which is bottom end there are two other sections that are Layer section at left and at right there is Timeline frame panel. You can make your own working screen as per your requirement by changing the place of these sections.

For seeing full image click on the image.


We can import file in after effect by three ways. Let us discuss them one by one.

Steps:
  • Go to file menu of menu bar.
  • click on Import option of the list.
  • click on File option of popup list of Import option.
  • Select your desired file from import box.
  • click on import button of this box. 
Explanation of steps:


First go to File menu of Menu bar of this software which is at the top of the user screen. Now go to import option of popup list of File menu. You will see some options for importing file in this software. You can choose any one of them according to file format and its purpose. I will click on File option of new popup list.


Now a Import popup box will be open.


For second way of opening import popup box, go to project panel of this software and make double click here with mouse button and import popup box will be open.


Third way is make right click with mouse in this project panel and click on Import option of opened popup list.


Next is you can directly pick your file from the folder where you have saved it then drop it in project panel with the help of mouse.


In All of the above three way when import box is open then go to that folder in your personal computer where you have saved it then click on your desired file with mouse click for selecting it. When you selected your desired then press import button of this box.


And your selected file will import in project panel area.


  • This is a way through which you can import any file in after effects effect easily.

Sunday, May 3, 2020

Presspull command in autocad in hindi

presspull autocad in hindi

जैसा कि हम जानते है कि Auto Cad एक computer aided designing software है, जो कि engineering designing professionals के बीच बहुत लोकप्रिय है। Auto Cad मे बहुत से 2d  और 3d commands होते हैं, drawing बनाने के लिए। आज हम इस blog मे एक 3d command  को समझेंगेे जो कि है presspull command command. अतः चलिये देखते हैं कि  Presspull क्या है Auto Cad मे।

What is Presspull in Auto Cad in hindi?

Presspull एक ऐसा command है जिसके जरीये हम किसी model के particular section को extrude या or subtract कर सकते हैं। वास्तव मे presspull दो अलग अलग commands का एक ही command होता है, ये commands हैं auto cad के extrude और subtract commands.अतः हम इस को समझते हैं और जानते हैं कि कैसे presspull का प्रयोग extrude command या subtract command की तरह auto cad मे होता है।

How to use presspull command Auto Cad in hindi?


हम presspull के जरीये  2d shape को extrude या subtract करके 3d model आसानी से बना सकते है। अत:  presspull command को सीखने के लिए दो methods हैं जो कि हैं किसी 2d आकार को extrude करना और दूसरा किसी 2d आकार को subtracted करना। अत: हम पहले presspull के extrude command को समझते हैं।

इस method को समझने से पहले चलिये हम इस software के  User Interface को अच्छे से जान लेते हैं, जिससे कि इस  पर काम करना हमारे लिए आसान हो जाये। इस software के सबसे ऊपरी भाग मे कई Menu हैं, जैसे Home menu, Insert Menu, Annotation menu और कुछ अन्य, ये सभी menu हमे इस software के command और  tool को व्यवस्थित करने मे मदद करता है, इस सॉफ्टवेयर के बीच के भाग मे एक display window है जहाँ आप अपने किये गये काम को देख सकते हैं, सबसे नीचे आपको कुछ navigation commands मिलते हैं जो कि drawing बनाने मे हमारी मदद करते हैं।

अब हम हमारे इस command के लिए Workspace switcher option पर जाके workspace screen को बदलते है, जो कि इस software के नीचले भाग मे दाँयी तरफ है। जब आप इस option पर click करते हैं, तो एक popup list खुलती है, यहाँ से आप 3D basics option को चुनिये क्योंकि presspull command हमे  इस software के modeling sections मे मिलता है, 3d command होने के कारण।


ये 3d Basics का user interface screen है, जिसमे अलग अलग प्रकार के modeling commands हैं।


अब हम एक polygon shape लेते हैं, presspull command को सिखने के लिए Home menu के  Draw tab से, जो कि इस software के ऊपरी भाग मे है।


 अब आपसे polygon की side की value देने को कहता है जिस प्रकार का आप आकार बनना चाहते हो उसके अनुसार। हम 6 देते हैं क्योंकि हम 6 side वाला polygon shape बनयेगें और अब enter key दबायें।


अब एक point लीजिये जिसे आप इस polygon का center बनाना चाहते है, इसलिए हम एक point लेते हैं या आप कोई value भी दे सकते हो।


अब आप को दो options दिखेंगे जो कि है,  'Inscribed in circle' जिसका मतलब है कि polygon की sides आप के द्वारा दी गयी circle की radius के बराबर  होगी और दूसरा है, 'Circumscribed about circle'  जिसका मतलब है, जो polygon बनेगा वो  दी गयी  radius के circle के circumference पर बनेगा। अब आप अपने अनुसार कोई एक चुन सकते है। हम Inscribed in circle  को चुन कर keyboard कीenter key के दबाते हैं।


अब आपmouse pointer को खीसका कर hexagon बना सकते है या आप radius की कोई value भी दे सकते हैं। अभी के लिए हम  hexagon बना लेते हैं।


अब हम presspull command की मदद से 3d model बनाने के लिए view को 3d view मे बदल लेते हैं।।इसके लिए View Controls option मे जाईये जो कि software के ऊपरी बाँये भाग मे है, और इस पर click करें।


अब एक a popup list खुलेगी। इसमे से  SE Isometric view को चुनिये जिससे आप इस आकार को south east direction से देख सकें।

अब Home menu के Create tab मे  Presspull command के लिए जाईये।

अब  आप उस आकार को  select करीये जिस पर आप presspull command का प्रयोग करना चाहते हो। यहाँ हम hexagon को चुनेगें। आप इस आकार के अन्दर या किनारे पर click करके इसे select कर सकते हैं। 


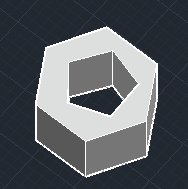
आप जैसे ही click करोगे  presspull command इस आकार को 3d model मे बदल देगा। ये इस 3d model काwire frame view है।


अब आप इस आकार को दो direction मे extrude कर सकते हैं। पहलाupward directions और दूसरा down ward direction में। Upward के लिए mouse pointer in को upward direction मे  drag करें और इस तरह से extrude upward direction में बनाया जा सकता है।


Down ward direction के लिए  mouse pointer को down ward direction drag करें और इस प्रकार extrude down direction  में काम करता है।

आप अपने object को  shaded form में भी देख सकते हैं। Shaded में बदलने के लिए View Style controls option  में जाकर किसी भी Shaded option पर  click करें।

अभी के लिए हम popup list की 'Shaded with edge' option पर click करते हैं। अब आप का object इस तरह दिखेगा।


चलिए अब हम ये समझते हैं, कि presspull command से subtract कैसे करते हैं। आप फिर से polygon command Home menu के Draw tab  से लीजिए और एक pentagon इस प्रकार से पिछले steps को follow  करके बनायें। Pentagon के लिए side की value की 5 है।


फिर से  Presspull command icon पर click करके इस लीजिए और इस pentagon पर click करें। आप इसे भी upward direction में drag करके extrude कर सकते हैं।


लेकिन अगर आप इस pentagon को Hexagon से subtract करना चाहते हैं, mouse pointer कोdown ward direction में drag  करें और छोड दें। 

आप जैसे ही छोडेंगें presspull इसे  Hexagon से subtract  के देगा इस प्रकार से। 


आप आगे भी इस extrude या subtract किये हुए आकार को फिर से  presspull command की मदद से extrude या subtract कर सकते हैं।


इस प्रकार से आप  presspull command को auto cad में use कर सकते हैं और इसके parameters को अपने अनुसार बदल सकते हैं auto cad में कोई भी complex model  बनाने के लिए।

Saturday, May 2, 2020

Hatch command in auto cad 2020

Hatch auto cad

As we know guys Auto Cad is computer aided designing software which is most popular among engineering designing professionals. Auto cad has many 2d and 3d command for making its work very easy so today we will discuss a 2d command that is Hatch. There we will understand it with an example and also get knowledge about its parameters in auto cad software.

What is Hatch in auto cad?

Hatch is a of 2d command in auto cad software. We can understand hatch command is a command through which we can apply any pattern on any part of our drawing or we can show cross section  of any part of our drawing in auto cad. So today will we discuss all about hatch command for getting introduce with this command. So let us under this command through some example in auto cad.

How to use Hatch in Auto Cad?

Steps:

  1. Go to draw menu of Home tab of this software.
  2. Click on Hatch command icon.
  3. Choose object selection method from hatch creation tab.
  4. click on object on which you want to apply hatch.


Explanation of Steps:

So let us start our topic and learn about hatch command in our drawing of auto cad.

Before going through this method let us have a quickly review on the User Interface of this software so that handling of this software become easy for us. Starting from top here we have different Menus such as Home menu, Insert Menu, Annotation menu and some others, each of them helps us for managing of command and tool of this software, move to next section that is display window which is at the middle of this software, in this window you can see your drawn object of any drawing or whatever you draw in this software that will be display on it, if we talk about button end of this software then there are many option of navigation which helps us in handling of parameters during our working in this software.

This is Drafting and Annotation workspace screen of this software which is set as by default screen of this software.

https://gtxmentor.blogspot.com/2020/05/hatch-command-in-auto-cad-2020.html


For Hatch command let us make a drawing of an engineering drawing. We will make this type of plate shape as a part of any particular machine. Here in this shape we have three whole two for locking it with machine and center one is for shaft of machine.


Now i want to show cross section of this plate from front view and top view. So i will click on Hatch command which you can find in draw menu of Home tab of this software.


Or you can press H button of keyboard then press enter for making Hatch command active.


When you click on this command then a tab will be open in command section of this software which is named as Hatch creation. In Hatch Creation tab you will find all its parameters.


Applying hatch command with pick point method

For pick point method we will follow these steps:

Steps:


  • Choose your desired pattern from pattern tab of hatch creation.
  • Click on pick point method icon.
  • Choose an internal point inside the object.


Explanation of steps:

Now choose any one of the pattern for your part on which you want to apply hatch. I will click on this pattern in pattern tab of hatch command as hatch pattern of my plate.


Now click on pick point method which is at the Boundaries tab of hatch creation tab.


Then hatch command will ask you to select a point inside your object. So i will click on here because when i cut this plate from center for showing cross section then there will be solid port leaving holes. Now make click for apply this pattern.


Now let us discuss second method that is Select method.

Applying Hatch command with Select method

Steps:


  • Go to boundary tab of hatch creation.
  • Click on Select icon.
  • Click on boundary of object which you want to hatch.


Explanation of steps:

Click on the icon of this option. When you click on it. Command will ask you to select the boundary of your desired hatching part. So i will select the boundary of this part of plate and make click then hatch will apply to my object like this and covers all the area inside circle of this plate.


So you can choose any one of the two methods according to your requirement.

How to remove hatch in auto cad:

Steps:

  • Click on Remove button of hatch creation.
  • Click on boundary of  hatched object.
  • Make left click of mouse button to remove hatch.

Explanation of steps:

If you want to remove your applied hatch then click on the icon of Remove tab of hatch command.


Now it will ask you to select the boundary of object of which hatch you want to remove. So i will click on this boundary and make click.  When i make click hatch will be remove from this object.


Parameters of Hatch command in auto cad

Now let us see the different parameters of this command which you can manage from the different type of  options of hatch command.
Or again take hatch command ans apply it now object. Now click on Settings option for the different parameters of this command. 


When you click on Settings option a popup box will open. You can make different settings of hatch from here also which we will discuss in continuation of our article.


Now let us analyze each option of parameters of hatch command.

How to change color of hatch lines:

  • Go to properties tab of hatch creation or hatch editor.
  • Click on drop down arrow button of By layer option.
  • Choose your desired color from color box.
Explanation of steps:

First if you want to change the color of hatch line then there is two options, first is choose your desired color or change after applying hatch on object. So for hatch line color go to this option an choose your desired color and  hatch line color will be change as your chosen color.


How to change color of hatch:

  • Go to properties tab of hatch creation or hatch editor tab.
  • Click on None tab.
  • Choose your desired color from color box.

Explanation of steps

Now you can choose color of blocks of hatch from this option. As hatch line we can change color before drawing hatch or after drawing hatch on our object. If i choose this color then blocks color will change like this.


How to set transparency of hatch in auto cad:
  • Select hatch.
  • Go to hatch transparency option of properties tab of hatch editor.
  • Increase or decrease vale of hatch transparency.

Explanation of steps

You can manage visibility of hatch by managing the value of hatch transparency. For example i select this hatch then decrease the value of hatch transparency. Then visibility of hatch become dull as shown in figure.

How to set Angle of hatch in auto cad:
  • Select hatch.
  • Go to Angle option of properties tab of hatch editor.
  • Increase or decrease vale of angle.

Explanation of steps

You can change the angle of hatch from Angle option of Properties tab of hatch Creation bar. If i enter 134 degree as hatch angle then hatch will incline at 134 degree.


You can manage density of hatch lines or blocks on any particular object. For increasing density decrease scale vale from scale option of Properties tab of hatch creation bar or for decreasing density increase scale value.


You can choose origin point of hatch from this option.


Just click on it and choose origin point in your object then hatch lines or block will start from your chosen point.


Next option is Match property. It will help you if you want to copy any applied hatch of any object of your drawing. For using this option click on it then select hatch which you want to reuse on other object of your drawing.


Then click on object on which you want to apply it.


So this is all about the hatch in Auto Cad. You can now handle its parameters without any problem and use it for making good engineering drawing. After this article there will be no doubt in your mind about hatch of Auto Cad.

After effects timeline

After effects timeline What is timeline in after effects Timeline is an important section of after efftect from where we make adju...